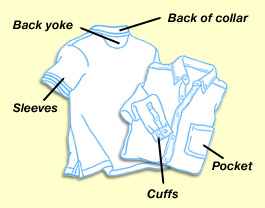
Apparel Buying Tips
|
|

|

|

|

|
|

Logo Design
Following the tips below can help assure the artwork you provide will
achieve the dynamic results you want when your logo is screenprinted or
embroidered on your wearables. It can also help increase the efficiency
and quality of the decorating process. Art that is "ready" for
use is provided in an electronic file that can be used for pre-press and
printing without making modifications. Below are a number of important
considerations and tips to help get your art ready for decorating.
Acceptable Artwork Formats
Art may be provided in any of the following formats. Please note the
modifications that may need to be made it order to make each format ready
for decorating.
For all three formats, proper resolution is critical for clean results.
The standard resolution for printed artwork is 300 dpi (dots per
inch).
Mechanical artwork
The traditional standard for acceptable mechanical artwork is
"camera-ready black and white." Mechanical artwork can be
supplied on a sheet of white paper or bromide, and should be no larger
than 8.5" x 11".
Hand-drawn artwork
A logo that's been drawn by hand is a great starting point, but it will
need to be digitized and modified for practical use.
Digital artwork
Images created in Corel Draw, Adobe Illustrator, QuarkXPress, Adobe
Acrobat Reader, Microsoft Word, Excel, or Powerpoint are preferred over
mechanical and hand-drawn artwork for quality of the end result and
efficiency. However, digital artwork may still require modification and/or
preparation for the decorating process.
File suffixes: If your digital artwork file ends with any of these
suffixes, it can be used to properly prepare your art:
.bmp
.eps
.gif
.pct
.pdf
.tiff
Proofs: Any time you supply digital artwork, be sure to include a
printed proof for reference.
Disk formats: When providing your artwork on disk, it is best to
use one of these more standard disk formats: CD-Rom or regular floppy.
E-mailed art: When sending your artwork via e-mail, be sure to
provide all of the basic elements, including:
- fonts
- layers
- paths
Unacceptable Artwork Formats
Artwork provided in the following forms, or similar forms, will not be
able to be modified into ready art... therefore delivering extremely poor
results when translated into decoration for a garment:
- on a fax sheet
- scanned into a computer
- on a business card
- on a printed promotional item such as a napkin or matchbook cover
Logo Placement
Consider these lesser-used, but highly noticeable, garment locations
for a unique logo/artwork placement.
Return to Top

Estimating Stitch Count
Here is an easy way to estimate the amount of stitches you'll need
for great-looking logos.
- Print out the grid below
- Cut out your artwork and place it over the grid
- Count the number of boxes it fills, then find that number in the chart
- If your design goes outside the grid, estimate the extra grid space you
need and add it to your original total.
Other Points to Remember when Estimating a Stitch Count
- 1 solid square inch of embroidery equals approximately 2,000 stitches.
- 1 solid square 1/4 inch of embroidery will equal about 125 stitches.
- No letter should be smaller than 3/16". Each letter 1/4" in
height equals about 100 stitches.
- Drop shadows in your logo will translate to 200 extra stitches per inch.
- Straight lines under logos typically require 200 extra stitches per
inch.
- Fabrics, colors, and artwork detail will affect the amount of stitches.
It is important to remember that these stitch-count tips, and the
stitch-count grid, provide
estimates only. They are a
good starting point to arrive at a ballpark count, but the precise figure
can only be determined when the actual embroidery of your design is
performed.

Note: Due to differences in computers and printers, the size of the
grid may be distorted when you print it out. Be sure to check that 1-inch
squares actually measure 1 inch on your printout (do the same for 1/4-inch
squares). If such a size distortion occurs, you can scale your printout of
the grid to a more accurate size using a photocopier.
Return to Top

Although embroidery is the preferred decorating method, there may be times
when screenprinting is appropriate. In these instances, it is important to
consider the following points.
It's important to remember that every color you want used in your
artwork means another screen to create, set-up, and print through. The
costs connected with these screens depend on the techniques used.
It's always beneficial to print more items than less because of the
set-up charges involved. If in doubt about the final quantity of
screenprinted items you'll need, it's often more economical to order
more than you think will be required.
Every color has an associated cost; different colors have different
chemical make-ups, which make them more or less expensive than others.
Drop shadows, shading and anything that blends from light to dark will
probably end up looking like a series of dots and should be avoided. (This
does not apply to single-color halftone gradients).
Most likely, the following special requirements will add to your
screenprinting costs:
- If you need your screenprinting to match an exact color, requiring inks
be custom-mixed to achieve that PMS color
- The process that allows colors to show correctly on dark goods
- Additional locations on a garment
- Special (not the normal) logo locations
Return to Top

The following guidelines can help you streamline your buying and,
therefore, boost your profits.
Buying for Men: Any style listed as Adult are sized for men. Adult
Golf-cut styles generally offer a better fit for beefier male builds.
Buying for Ladies: Styles listed as Ladies' are women's sizes. If
the women on your team prefer a Men's or Adult style, select one size
smaller than what they would wear in Ladies' sizes.
Buying for Groups: Use the charts below for a general percentage to
help you determine how many shirts in each size you need when buying for a
group.
To calculate your buying quantities by size, simply multiply the number
of people in your group by the percentage in the chart for each size.
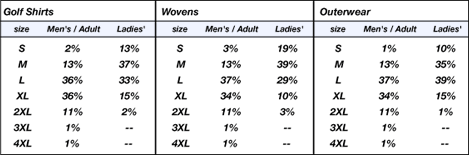
These are general guidelines only and should only be used as a starting
point for determining necessary quantities. Your group sizes may vary
greatly.
Return to Top
|
|